
Character consistency, keyframes, Google Flow, Google Vids—every mistake is documented here
This isn’t a feature overview. It comes from a 38-second drinking water commercial that I actually finished. Nearly every problem a first-timer runs into showed up during this project.
The product, logo, and tagline in this article are used only to demonstrate the production method. Before releasing any commercial content, confirm that you have the rights to use the people, music, product packaging, and brand assets involved.

Break the film down first
The final cut is about 38 seconds, 16:9 widescreen. It’s assembled from 15 short clips. Each clip starts with a static keyframe image, Veo generates a few seconds of motion from it, and then Google Vids trims and joins everything together.
The pipeline is straightforward.
Write the shot list
→ Prepare character and product reference images
→ Generate keyframes
→ Google Flow generates each video segment
→ Generate Chinese voiceover and find music
→ Upload to Google Drive
→ Google Vids: assemble, add text, add audio, export
You don’t need to master every tool on day one. Finish one thing, then move to the next.
Organize your files before you start
First-timers almost always lose control in the second half of the project. Videos, voiceovers, and product images end up scattered across the Downloads folder, and by the time you’re in Google Vids you’re guessing which thumbnail is which.
Create a project folder on your computer first.
Drinking Water Ad Project
├── 01 Character References
├── 02 Product References
├── 03 Keyframes K01–K15
├── 04 Videos V01–V15
├── 05 Voiceover VO01–VO06
├── 06 Background Music
├── 07 Logo and End Card
└── 08 Final Export
Rename each file the moment you download it. Don’t wait until everything is done.
V01_forest_walk.mp4
V02_side_profile_look_up.mp4
V14_drinking_closeup.mp4
V15_end_card_background.mp4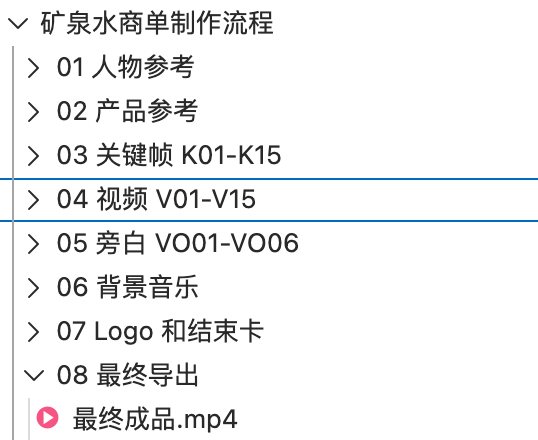
Keep the story short so the shots stay clear
This commercial’s story isn’t complicated. A hiker walks into a misty forest, passes streams and mountain paths, reaches the summit, and takes a drink. The first half is cool green; the second half gradually warms up.
Hand this to ChatGPT and ask it for a shot list. Don’t let it write a long ad script. What you need is something that translates directly into images.
Write a shot list for a 38-second, 16:9 drinking water commercial.

The lead is a Chinese woman in her early 30s who hikes into a misty forest, passes streams and mountain scenery, then reaches the summit and drinks the product.

The first half uses cool greens, mist, and streams. The second half gradually shifts to warm gold, ridgelines, and sunset.

No dialogue, no lip sync. Camera movement is slow, natural, and restrained. Product, subtitles, and logo are all handled in post.

Break it into 15 shots. For each shot include duration, shot size, action, camera movement, environment, lighting, and where the frame's negative space sits.
The film ended up using the pacing below. Use it as a template or swap in your own subject matter.
Veo typically generates clips longer than you’ll actually need. That’s fine—you’re only keeping the most natural second or two.

Lock the character first, then change the scene
If you ask the model to “generate a female hiker” for each individual shot, you’ll quickly end up with 15 people who look similar but aren’t the same person. Someone gets a new face, someone’s jacket changes color, someone’s backpack disappears entirely.
Two reference images are enough to start.
- One frontal or two-thirds profile shot to lock in the face, fringe, and age
- One full-body shot to lock in the jacket, trousers, shoes, and backpack
Keep the same character description throughout. The block below can go into your image prompts or into Flow’s character info field.
Chinese female hiker, 30–34 years old.
Oval face, dark brown eyes, straight black hair, light fringe, low ponytail, natural skin texture.

Fixed outfit: brown waterproof hooded hiking jacket, light grey crew-neck base layer, khaki outdoor trousers, black hiking boots, olive-brown hiking backpack.

She is quiet, natural, and resilient. Maintain the same facial identity, hairstyle, clothing colors, backpack structure, and body proportions in all subsequent shots.
Prepare the product image separately as well. A clean front-facing shot on a plain background is all you need. Don’t rely on the model to reproduce Chinese text or logos accurately on the packaging—especially in the drinking shot and the end card.

Every clip starts with a static image
A keyframe isn’t a random frame pulled from a video. It’s an image you design in advance: where the character stands, where the camera points, how bright the background is, where text will sit later. All of that is decided here.
Generate one keyframe for each of K01 through K15. For shots that include the character, always include the same set of character references. For pure landscape shots—birds, river valleys, pebbles underwater—you don’t need character references.
K01 can be written like this.
Use the provided character reference images to lock in the character's identity.

Same Chinese female hiker. Maintain the same face shape, features, black fringe, low ponytail, brown hooded hiking jacket, light grey crew-neck base layer, khaki outdoor trousers, black hiking boots, and olive-brown backpack.

Wide establishing shot. She walks alone along a narrow trail through a mountain forest in southern China. The character is centered slightly low in the frame and appears small relative to the environment. Tall trees, moss, ferns, wet fallen leaves, and soft morning mist surround her.

Cool green tones, soft diffused light, 28mm cinematic lens, realistic and cinematic, 16:9 horizontal composition.

Do not generate product, subtitles, text, logo, watermark, or other characters.
The product shot K14 has one key principle: stop the action at the easiest position to generate successfully. The bottle already at the lips is far more stable than “character picks up bottle and drinks.”
Use the provided character reference images to lock in the character's identity. Strictly use the provided product image as the product reference.

Same female hiker in a medium close-up side profile at the summit, drinking. She holds the bottle naturally with the opening already at her lips. Distant mountains are soft-focused; the bottle has natural highlights and a small amount of condensation.

Maintain the product's bottle shape, cap, body texture, label colors, and overall proportions. Maintain the character's face, hairstyle, and outfit.

Realistic commercial photography, 85mm lens, 16:9.

Do not generate a second bottle, do not add fingers, do not alter packaging text, do not generate subtitles or logo.
Keep text and logos out of the keyframes entirely. Adding them manually in Google Vids later is far more reliable.

In Flow, the Character is only there to remember this person
If you’ve already generated your character in ChatGPT or another image tool, don’t rebuild them in Flow. Use the existing portrait and full-body image to create a Character directly.
In Google Flow, click Characters, then New Character. Upload the portrait and fill in the character details. If you don’t have a full-body image, click Create Body. If you already have one, just upload it.
Name the character something simple like HikingLead. Later, type @ in the prompt box and you can select her directly.
Skip the voice setting for now. The character’s voice and the Chinese voiceover in post are two separate things. Since there’s no lip sync in this commercial, you’ll get better results using ElevenLabs or another dedicated voice tool.


Google Flow does one thing: make the keyframe move
A few terms in Flow will slow you down at first.

Frames is enough for standard shots. Put K01 in Start frame and leave End frame empty. End frame is designed for explicit two-image transitions; most shots in this film don’t need it.
The motion prompt for V01:
Use the uploaded K01 image strictly as the starting frame. Aspect ratio is 16:9 horizontal video.

Maintain the character's face shape, features, black fringe, low ponytail, brown hooded hiking jacket, light grey crew-neck base layer, khaki trousers, black hiking boots, and olive-brown backpack exactly as they appear in the first frame.

She walks slowly and naturally along the forest path toward the camera. The camera pulls back at the same pace, holding the wide composition. Her arms and backpack move slightly with her steps; the mist between the trees drifts slowly; leaves have only minimal movement.

Realistic, cinematic, cool-green forest morning mist, natural light, restrained action.

Do not generate subtitles, text, logo, watermark, product, other characters, dialogue, lip sync, or background music. Do not alter the character's face, change clothing, add fingers, introduce flickering, or move the camera suddenly.
All 15 clips follow the same logic: minimal action in the frame, one camera movement at a time.

Don’t overthink whether to generate 4, 6, or 8 seconds. You’ll often only use one or two seconds of it anyway. Pick whatever the system allows and trim in editing.
Use Ingredients for the product shot
For V14, don’t use Start frame alone. Once a product is part of the action, the model tends to alter the bottle shape, cap, or label.
Switch to Ingredients and put K14, the product front image, and @HikingLead in the same generation. K14 controls the composition, the product image controls the packaging, and the Character controls the lead’s face and clothes.
Use the three reference materials currently added.

The first is the composition reference for the drinking shot. The second is the actual packaging of the drinking water product. HikingLead is the fixed character identity reference.

Maintain the lead's face shape, features, black fringe, low ponytail, brown hiking jacket, khaki trousers, and olive-brown backpack exactly.

Strictly maintain the product's transparent PET bottle, white cap, body texture, label colors, red-and-white layout, and overall proportions.

The bottle is already at the character's lips. The character makes only the lightest hand and swallowing movement. The water, highlights, and condensation inside the bottle change only subtly. The camera pushes in toward the character and product very slowly.

Do not rotate the bottle, do not alter the bottle's length, width, material, or label layout, do not generate a second bottle, do not add fingers, do not alter the character's face, do not generate subtitles, text, logo, dialogue, or music.
Upload to Drive first—Google Vids will be much easier
On some accounts, the Uploads panel in Google Vids only shows Google Drive and Google Photos. Don’t discover this in the middle of editing.
Create a Drive folder and upload all 15 clips, 6 voiceover files, music, the product PNG, and the logo before you open Vids.
Ad Project Assets
├── V01–V15
├── VO01–VO06
├── BGM.mp3
├── product_transparent.png
└── official_logo.png
Wait for the upload to finish, then open Google Vids. Clicking assets from Drive is much easier than hunting through multiple windows.

Start Google Vids with a rough cut
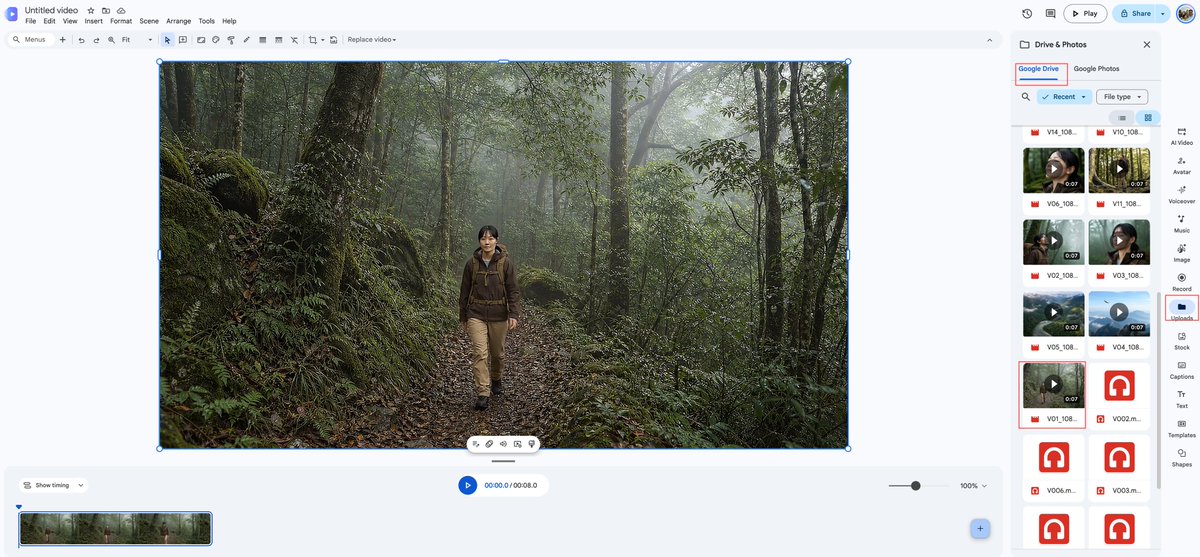
Open vids.new and choose Blank vid. Confirm the aspect ratio is Widescreen 16:9.
On the right you’ll see AI Video, Voiceover, Music, Image, Uploads, and Text. Since the video, voiceover, and music are already done, you’ll mainly use Uploads and Text here.
Start by importing V01.
- Click Uploads
- Find V01 in Google Drive
- Click it to place it in the current Scene
- Select the video and fill the canvas
- Mute the Veo native audio
- Open Show timing and trim the clip
Each clip gets its own Scene. After placing V01, click + at the end of the timeline to create Scene 2, then place V02. Don’t click two videos in the same Scene—they’ll stack on top of each other.
For the rough cut, use the timing table below as a starting point. A tenth of a second either way doesn’t matter. Whether the motion reads smoothly matters more than the exact number.

Cutting directly from V01 (walking toward camera) to V02 (side profile, looking up) can feel abrupt. Start with the shortest Fade you can—between 0.15 and 0.25 seconds. When two close-up faces overlap, don’t force a dissolve. Insert a half-second cutaway of water or a valley, then cut to the side profile. It reads much more naturally.



Text, voiceover, and music all come after the rough cut
Don’t add music while the picture edit is still unsettled. Every time you adjust a shot, the audio has to be repositioned.
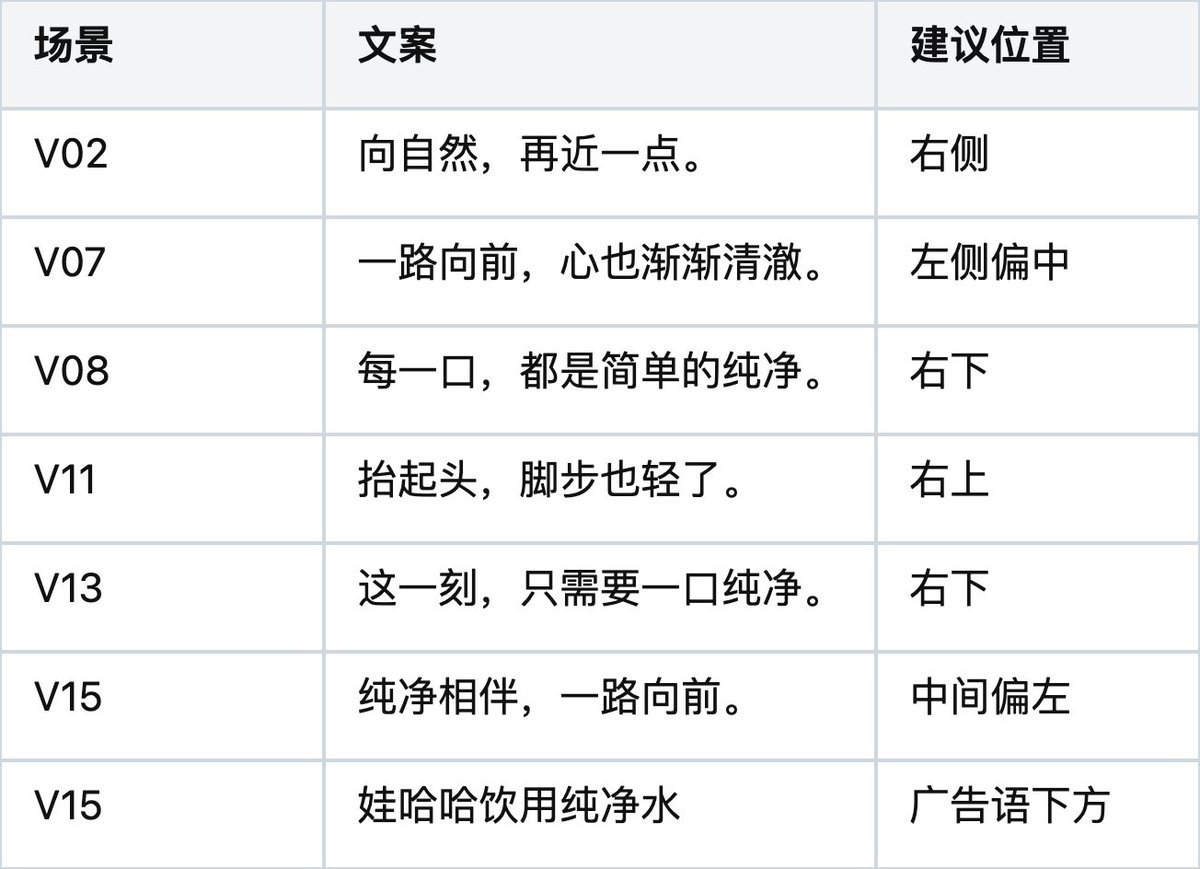
Use Text for Chinese copy, not Captions
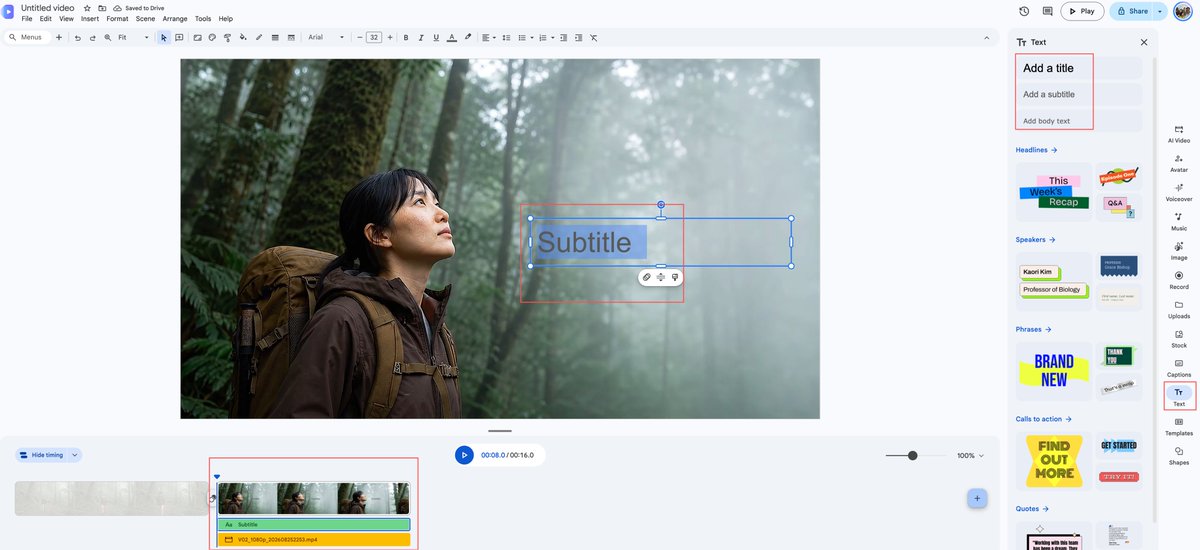
Captions is a word-by-word subtitle style. For the few lines of ad copy you need to place yourself, click Text on the right panel to add a text box.
Recommended style:
Font         Noto Sans SC
Body copy    30 pt
End card     42 pt
Product name 26 pt
Color        White
Weight       Regular or Medium
Shadow       Light black shadow
Animation    Fade
If Noto Sans SC isn’t available, try Noto Sans CJK SC, Source Han Sans, Google Sans, or Arial in that order.
Text timing is relative to the current Scene. Select the text box, open Show timing, and drag the left and right edges of the text bar.

Split the voiceover into six segments
Splitting the voiceover lets you place each line over the matching shot rather than hunting for positions inside one long audio file.
VO01  Closer to nature.
VO02  Moving forward, the mind slowly clears.
VO03  Every sip—simple, pure.
VO04  Look up. Your steps feel lighter.
VO05  In this moment, all you need is one pure sip.
VO06  Pure water. Pure company, every step of the way.
After uploading the files to Drive, click the correct point on the Vids timeline first, then select the file from Uploads.

Select the voiceover track and set it as Narrative.
Listen to the music’s groove before trimming its length
Background music can come from Suno, Pixabay Music, YouTube Audio Library, or any other licensed library. Read the download and commercial-use terms before using anything. Don’t try to work around Suno’s free-tier download restrictions by screen-recording or re-recording the audio.
Place the music at second 0, select the music track, and set it as Background. Start the volume between 20% and 30%. If the music still drowns out the voiceover when the narration comes in, keep lowering it.
Start time   0:00
End time     end of video
Fade in      0.8 s
Fade out     1 s
If the music is over a minute long, keep only what the video needs. Drag the right edge of the music track to the end of the video. To skip an intro, cut the track at the chorus, delete the intro, and drag the remaining segment back to second 0. Never speed up the music.

End on the real product
The summit footage in V15 is just a background. The product, brand name, and tagline are all handled in post.
Right side        Character and summit background
Left side         Real product PNG
Center-left       Pure company, every step of the way.
Below tagline     Product name or official logo
If the product image has a white background, try Edit image in Vids to remove it. After processing, compare it against the original. Brand text, label, and colors must not quietly change.
The end card should hold for at least four seconds. There’s no complex motion in these final seconds—letting the product and copy sit on screen is enough.

Watch it twice before you export
First pass: picture only. Does the character’s face change? Does the base layer or backpack shift? Does the bottle distort? Does any text block the face or product? Does the end card hold long enough?
Second pass: audio only. Is the voiceover clear? Does the music cover the narration? Is the product name pronounced correctly? Does the music fade out naturally at the end? Is any Veo native audio still audible?
When done, click File at the top of Google Vids and choose Download as MP4. After it downloads, play it once on your phone. Phones are the easiest way to catch text that’s too small, music that’s too loud, and product visibility that isn’t enough.
Final film (product replaced for compliance):


